Friday, June 29, 2012
Cabbage and Chicken Noodles
This recipe has an amazing trick in it. Last week, Ned and I were helping with distributing the CSA boxes at the Williamsburg location and the last person to come pick up told me about it, sadly, I can't remember her name. So mysterious fairy godmother of cabbage - I owe you big time. We've been using it a lot, and cabbage is becoming a major part of my diet.
So this is the trick:
As anyone who ever tried raw cabbage knows, it's a bit hard, not very tasteful (or rather have this annoying flavor a lot of people hate) and also can be quite hard on the digestion. Yes, you can cook it or make sauerkraut, but that takes time and also, in case of cooking, the whole house smells like, well, boiled cabbage.
So, this easy trick makes the cabbage delicious, soft and still crunchy, no smell, easy to digest and easy to snack on or add to other ingredients to make salads or anything else.
Take a whole cabbage, cut it in half then slice each half as thin as possible. put the shredded cabbage in a big mixing bowl and sprinkle with handfulls of salt, put in lots (don't worry, it's going to washed off) mix with your hands till all the cabbage is covered in salt.
Leave on the counter for about an hour or more. The cabbage will get softer, and also, ooze out some of the water. Then, wash the cabbage from all the salt (I used a pasta strainer) and ring all the water out.
That's it! this keeps in a tupperware in the fridge for a week or more. It's yummy to snack on just like that, or use for anything.
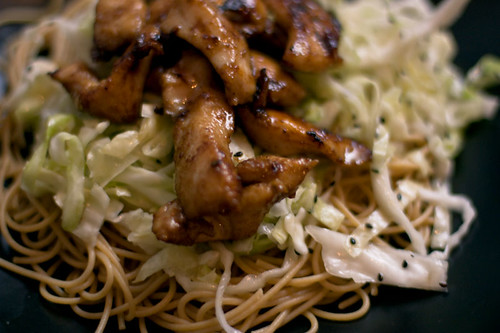
This is what I made of it.
Asian Chicken and cabbage Noodles
Ingredients:
2 punded chicken breasts
about half a cabbage - salted and rinsed
3 TBS sesame
noodels of your choice (I used wholewheat spaghetti)
Chicken marinade:
4-5 TBS Soy Sauce
2 TBS honey
1/2 TS chilly flakes
Asian Vinaigrette:
4 TBS rice vinegar
2 TBS Sesame oil
1 TBS Mustered
How to make it:
Mix all the marinade ingredients, cut chicken into strips and marinade them for about half an hour.
Mix all the vinaigrette ingredients.
Cook noodles.
In a frying pan. Toss the chicken stripes. pour the left over marinade on top and mix till chicken is cooked through.
In a mixing bowl. toss the cabbage, the sesame and the vinaigrette.
Serve noodles, cabbage and chicken piled on top.

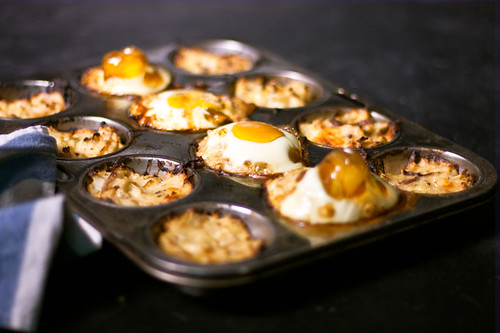
Cauliflower "Quiche"
I'm calling this "Quiche" instead of Quiche, because it's actually a fake, it doesn't have any crust in it, and is basically, just the quiche filling. To me that's tastier and healthier, but if you really love the crust and don't mind all the butter, you are quite welcome to add it.
Ingredient
1 whole cauliflower
1 onion
1 small yogurt container (I love FAGE, but whatever you have is good)
1/2 cup of grated cheese (I used cheddar, but I think a sharper cheese would work even better, like gruyere or even blue cheese)
2 eggs
4-5 TBS flour
Spices (I used black pepper, paprika and Nutmeg)
a little bit of olive oil
1 TBS brown sugar
If you want - extra egg per mini quiche and a bit extra grated cheese for decoration.
How to make it:
Break cauliflower info floretts and cook in water for about half hour till soft. when the cauliflower is cooked through, strain the water and leave to dry for a couple of minute.
Chop the onion and then fry it in a bit of olive oil. mix every minute or two, when it starts to turn golden, ad the sugar and mix for another 4-5 minutes till fully brown.
in a large mixing bowl. mash the cauliflower using a potato masher or a fork. the texture should be grainy and rough so that there are still chunk of cauliflower. Then add yogurt, cheese, egg, spices and fried onion.
Add flour, spoon by spoon and mix. Thickness should be like thick mah potato. If it's still runny, add a bit more flower.
Pour into a pie \ casserole \ muffin pan. Bake at 375 for about 30 minutes till the top browns and the house smells amazing.
If you want to go overboard. make a little hole on the top of each little quiche (or a few holes if using a large dish) and half way through baking, break and egg into each hole and sprinkle with cheese. Continue baking till the egg is cooked through.
Thursday, June 28, 2012
No-Mayo Coleslaw
Recipe courtesy of PBS.org by Marc Matsumoto.
Ingredients
-1/4 small red cabbage-1/2 small green cabbage
-1/2 carrot, shredded
-zest of 1/2 lemon
-1/4 cup lemon juice
-1/4 cup olive oil
-1 tablespoon honey
-1 teaspoon salt
-1/4 teaspoon black pepper
Directions
-Remove any tough outer leaves from the cabbage. Trim the core and any tough stems from the cabbage and thinly slice. Add to a bowl with the shredded carrot, lemon zest, lemon juice, olive oil, honey, salt and black pepper. Toss to combine.Serve this right away for more of a salad, or store it in the fridge overnight for a slaw that’s more pickled.
Zucchini Banana Bread
From Healthy Eating for Ordinary People.
Ingredients
Ingredients
3 very ripe bananas
2 eggs
1/4 cup honey
1/4 cup brown sugar
1 teaspoon vanilla extract
1 3/4 cup all-purpose flour
1 teaspoon salt
1 teaspoon baking soda
1/2 teaspoon baking powder
1 teaspoon ground cinnamon
1 heaping cup zucchini (1 small to medium), shredded
3/4 cup chocolate chips
Directions
-Preheat the oven to 350*. Lightly grease a standard sized loaf pan.
-In
a large mixing bowl, beat the banana for a minute or so till well
mashed. Add the eggs, honey, sugar, and vanilla and mix for another
minute or so, until smooth.
-Add the baking soda, baking powder, salt and cinnamon. Mix to combine and then add the flour.
-Stir in the zucchini and chocolate chips.
-Pour
the batter into the prepared pan. Bake for a little under an hour until
a toothpick comes out clean from center. Cool for about 1/2 hour before
turning the loaf out onto a wire rack to cool some more.
Wednesday, June 27, 2012
Salt & Vinegar Cabbage Mashed Potatoes
Ingredients:
12 cups filtered water
5 cups red *potatoes, cubed
2 cups shredded green cabbage
12 cups filtered water
5 cups red *potatoes, cubed
2 cups shredded green cabbage
1/2 cup apple cider vinegar
2 teaspoons kosher salt
2 garlic cloves, minced
3-4 tablespoons distilled white vinegar
1 tablespoons preferred oil [I used extra virgin olive oil]
1/4 cup preferred milk [I used almond]
sea salt and coarse ground pepper
1. In a large pot bring 10 cups of water and 1/4 cup apple cider vinegar to a light boil. Drop in the cabbage and blanch for about 2 minutes. Scoop the cabbage out and place it in a bowl full of cold water to stop the cooking process and set aside.
2. Go back to the large pot of water and add in 2 more cups of water, 1/4 cup apple cider vinegar, 2 teaspoons of kosher salt and bring this pot to a rapid boil. Once boiling, add in your potatoes and cook until very tender [approximately 15-20 minutes].
3. Once your potatoes are tender and can be pierced easily with a knife, drain and place them back into the pot. Add in the garlic, white vinegar, oil, and milk and with a hand masher mix until smooth. I like to get them to a smooth yet slightly chunky texture, this compliments the cabbage well.
4. Fold in the cabbage and season with sea salt and ground pepper.
Serve right away!
Total time: 45 minutes
Serves: 4-6
*Potatoes are on the Dirty Dozen list, choose organic whenever possible.
LIVING SIMPLY GLUTEN FREE
Tuesday, June 26, 2012
Creamy Baked Zucchini Pesto
Recipe from The Vegetable Centric Kitchen
Ingredients
-2-3 zucchini’s, chopped and baked til soft and dry
-1 cup basil
-1 clove garlic, chopped
-3 oz. sheep pecorino, shredded
-2-3 drops stevia
-juice of half a lemon
-sea salt and pepper to taste
Directions
Place all ingredients into food processor and process until smooth. You may need to add water to facilitate processing.
Monday, June 25, 2012
Herbed Fava Beans
This recipe comes from CSA members Christiane and Patrick at 28 cooks.
Ingredients
-1 1/2 pounds fava beans in shells, or 1 cup shelled
-2 tbsp olive oil
-2 tbsp red wine vinegar
-1 clove garlic, minced
-1/4 tsp salt
-1/4 tsp fennel seed
-1/4 tsp dried thyme
Directions
Heat a pot of water over a stove until boiling. In the meantime, shell fava beans. When water is boiling, add fava beans and boil for 3 minutes, until they are bright green. Remove from water and toss into ice cold water until cool. Strain well and remove beans from their little skins (you'll be able to see this easily after they are cooked) In a jar, combine remaining ingredients and add strained beans. Shake well and either serve immediately or store in the fridge.
Monday, June 18, 2012
Sauteed Garlic Scapes & Summer Squash
Ingredients:
1 zucchini
1 yellow summer squash
1-2 garlic scapes
extra virgin olive oil
sea salt & coarse ground pepper to taste
1. Wash and thinly slice squash into medallions. I sliced my about 1/8 inch thick. Whatever thickness you cut them, make sure it is uniform so they cook at the same speed.
2. Heat a good drizzle of olive oil in a large saute pan over medium-low heat.
3. Once the oil is warmed, add in the squash and cook for 2-3 minutes while flipping every so often.
4. While the squash is cooking prepare your scapes. Make a cut just under the base of the flower and discard. Cut the scapes into 1-2 inch long sections. Toss the scapes in with the squash, give the pan a good shake to mix in the scapes well. Add a splash more olive oil if necessary. Season with a pinch of salt and pepper. Cook for another 5-7 minutes. The squash should be tender [browning a bit] and the scapes should turn bright green. Sauteing scapes is similar to cooking asparagus. You don't want to overcook it, or it'll become stringy.
Tip: I put leftovers of this saute into the refrigerator and for lunch the next day I discovered it to be fantastic as a cold summer salad. I sprinkled on a handful of freshly chopped mint from my garden and and dug in. Yum!
LIVING SIMPLY GLUTEN FREE
Summer Squash & Zucchini Noodles with Meatballs
Recipe courtesy of our CSA member Laura
Noodle Ingredients
-Summer Squash
-Zucchini
Meatballs & Sauce Ingredients
-2 pounds grass-fed ground beef
-2 small carrots
-1/2 a large onion
-1 handfull (or 2) of spinach
-1/4 cup of almond meal
-1 egg (optional)
-1 -2 tsp basil (dried) to taste
-1 tsp oregano (dried) to taste
-1 tsp garlic powder
-salt & pepper (optional)
Noodle Directions
-To start, you will need 1 squash (zucchini or summer squash) per planned serving, depending on the size of the squash. To make a serving of 4, start with 4 squash. To make enough for 2 start with 2. As you cut/peel the squash you’ll see how much it makes and can either stop early or add an additional squash if it doesn’t look like enough “noodles”
-First wash the squash and dry it.
-Then cut the top and bottom of the squash, you’ll do the same for the yellow summer squash or the zucchini, so that you have a nice flat surface to stand the squash vertically.
- Next, use your vegetable peeler and start at the top and “peel” the squash by creating a peel the length of the squash.If you want shorter “noodles” you can cut the squash in half first, but I like the longer ones so you can actually twirl them around your fork when you’re done! Continue creating your peeled squash noodles until the remaining squash is too small to peel anymore. Take the remaining and cut it as thinly as possible so you don’t waste it and add it to the “noodle” pile.
-After you created your noodles, place them in a colander and let them sweat. This is a tip I took from Melissa Jouwlan’s Well Fed cookbook, and you do this to remove some of the water from the squash which keeps your noodles from being too watery at the end (anyone had this problem before?). In the colander, coat the squash with sea salt, and then let sit for 20-30 minutes.
Meatball and Sauce Directions
-To
make the meatballs, use a mini prep food processor and chop the
veggies (carrots, onion, and spinach) and then throw all the other
ingredients in a large bowl and mix it together. Create meatball from
the meat mixture and place in the pan to cook.-To start, you will need 1 squash (zucchini or summer squash) per planned serving, depending on the size of the squash. To make a serving of 4, start with 4 squash. To make enough for 2 start with 2. As you cut/peel the squash you’ll see how much it makes and can either stop early or add an additional squash if it doesn’t look like enough “noodles”
-First wash the squash and dry it.
-Then cut the top and bottom of the squash, you’ll do the same for the yellow summer squash or the zucchini, so that you have a nice flat surface to stand the squash vertically.
- Next, use your vegetable peeler and start at the top and “peel” the squash by creating a peel the length of the squash.If you want shorter “noodles” you can cut the squash in half first, but I like the longer ones so you can actually twirl them around your fork when you’re done! Continue creating your peeled squash noodles until the remaining squash is too small to peel anymore. Take the remaining and cut it as thinly as possible so you don’t waste it and add it to the “noodle” pile.
-After you created your noodles, place them in a colander and let them sweat. This is a tip I took from Melissa Jouwlan’s Well Fed cookbook, and you do this to remove some of the water from the squash which keeps your noodles from being too watery at the end (anyone had this problem before?). In the colander, coat the squash with sea salt, and then let sit for 20-30 minutes.
Meatball and Sauce Directions
-After the meatballs are mostly cooked, I add 1 - 2 cans of marinara sauce to the pan and then let it simmer for about 10 minutes (you can just add it and let it heat up too, the cooking is done at this point). Now before you judge, I know that I’m takeing a shortcut by using Trader Joe’s Marinara Sauce...I know its sacrilegious to not make my own sauce, but this one doesn’t have any crappy ingredients, tastes great, and helps to get dinner on the table faster! Trust me about the can too, it’s $1.79 (I think) a can and the best value for your dollar!
-After you’ve let the squash noodles sit, rinse the salt off and then dry the noodles (you just did all that work to remove the excess water after all). Then throw them in a large saute pan.
-I added a tiny bit of coconut oil since I didn’t want them to stick. Toss the noodles in the pan, moving with a wooden spoon for 3 to 5 minutes, until the squash is tender. Place the squash on plates and get ready to serve!
Labels:
grass-fed beef,
squash,
zucchini
Thursday, June 14, 2012
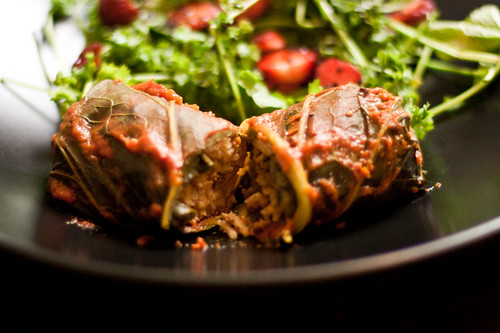
Stuffed Kale
Ingredients
For Stuffing:
1 tbs olive oil
1 cup of rice
1 onion, chopped
1/2 lb ground beef
1/2 can\box of strained tomatos
raisins, cranberries, almonds or other nuts \ dried fruit
curry powder or any other spices you like
1 cup of water For
Kale:
3-4 tbs olive oil
a bunch of large kale leaves
water
1/2 can\box of strained tomatos
1 lemon, sliced
6-8 garlic cloves, peeled
How to make it:
Fry onion in olive oil, till it start getting translucent, add the beef and mix together crumbling the meat. Ad the rice and spices and steer for 1-2 minutes.
Mix strained tomato with 1 cup of water and pour into the pot then add the fruits and nuts. let cook for about 7-8 minutes till most of the water evaporate and the rice begin to soften but not fully cooked then turn the stove off and let the rice cool down a bit.
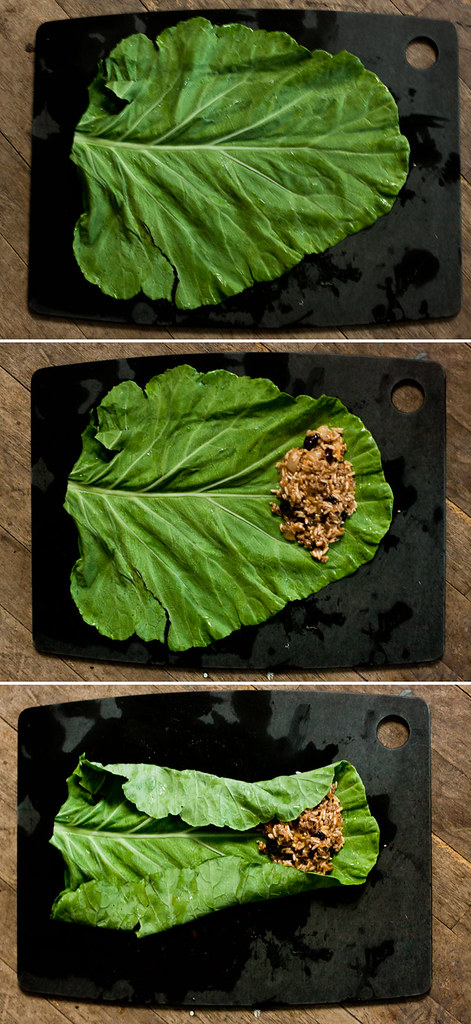
In the meantime, prepare the kale - wash the leaves and cut off the top part where the stock is thicker (make the cut in the widest park of each leaf.
When the rice if cool enough to touch, spread the leaf on a chop board and pile 2-3 spoons of rice in the bottom part of the leaf, fold the sides then role the whole leaf like an eggrole!
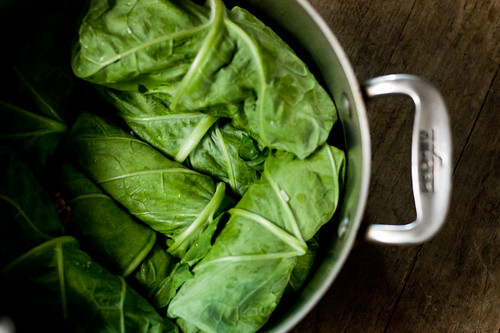
Pour 1-2 TBS of olive oil in a pot and place the stuffed kale in the pot.
Repeat with all the leaves. when one layer of stuffed kale is in the pot, you can pile a second one, place garlic and sliced lemons and a bit more olive oil between the layers.
When all the leaves are stuffed, mix the other half of strained tomato can with a cup of water and pour on top, fill with water till all the leaves are covered. put the pot on the stove, on high flame till it boils, then lower the flame and cover with a lid. Let it cook till all the water evaporate (45 minutes to an hour)
Labels:
Collards,
grass-fed beef
Monday, June 11, 2012
Roasted Beet and Arugula Sandwich with Green Olive Tarragon Tapenade
recipe courtesy of My New Roots
Ingredients
-1 red beet
-2 slices whole-grain sourdough bread
-Extra-virgin olive oil, for brushing bread
-A good slather Green Olive Tarragon Tapenade (see recipe below)
-Handful of arugula
Directions
-Heat oven to 400°. Wrap whole beet in foil and roast until soft (time will vary depending on size of beet), about 40 minutes.
-Remove foil and let sit for 5 minutes until cool enough to handle. Slip skin off under cool running water. Slice.
-Brush bread with olive oil and toast until golden. Spread one slice with a layer of Green Olive Tarragon Tapenade, then top with beet slices and arugula.
Green Olive Tarragon Tapenade
Ingredients
-½ cup hazelnuts (or other nut)-2 cups green olives-¼ cup fresh tarragon (or parsley)
-1/8 cup capers
-Juice of one lemon (about 3 tablespoons)
-3 Tbsp extra-virgin olive oil
-1 Tbsp pure maple syrup (or agave or honey)
Directions
- Roast hazelnuts in a dry skillet over medium-high heat until fragrant and the skins begin to crack. Transfer to a food processor.
-Add all other ingredients and pulse until chunky and well mixed. Blend a little longer for a smoother texture. Store tapenade in the fridge for up to one week.
Cumin Roasted Fennel & Cauliflower
Ingredients:
1 head of cauliflower
1 large fennel bulb
1 TBS. extra virgin olive oil
1 tsp. cumin
1 tsp. paprika
1/2 tsp. garlic powder
1/2 tsp. crushed red pepper
sea salt to taste
Preheat your oven to 400 degrees.
1. Wash and cut cauliflower into florets. Wash and cut fennel into quarters. If you are unfamiliar in working with fennel, watch this helpful and quick video, now.
2. In a large mixing bowl combine all of your ingredients. Toss together with your hands until each piece of cauliflower and fennel is coated well with the spices and olive oil.
3. Roast in the oven at 400 degrees for about 40 minutes. Once it is cooked about half way through flip it to its other side and continue to roast until each side is golden brown.
Serves: 4-6
Wednesday, June 6, 2012
Garlic Scape Green Goddess Dressing
From Teaspoon of Spice. See original post here.
Ingredients
- 3/4 cup Greek non fat yogurt
- 1 cup loosely packed flat-leaf parsley
- 2 garlic scapes, roughly chopped (or 1 garlic clove, peeled)
- 1/2 avocado, pit and skin removed
- 1 teaspoon orange muscat vinegar
- Juice from 1/2 of a lime
- Water (to thin dressing)
- Salt & pepper, to taste
Directions
- In a food processor, add yogurt, parsley, garlic scapes, avocado, vinegar and lime juice. Process until smooth.
- For a thinner dressing, add water, 1 tablespoon at a time, and process until at a desired consistency.
- Add salt and pepper to taste.
Labels:
garlic scapes,
parsley
Warm Kale & Potato Salad
Ingredients:
*large bunch organic kale
*4-5 [small to medium] organic potatoes
5 cherry tomatoes, halved
2 cloves garlic, minced
1/4 cup diced green scallions
1-2 TBS extra virgin olive oil
sea salt and coarse ground pepper to taste
1. Wash kale well with cold water and do not pat dry, the extra moisture is good and will help cook the kale down a bit. Cut each kale leaf down to bite-sized pieces. Because of their bitterness and texture, I cut out the stems and use only the kale leaves.
2. Heat a large sauteing pan and a few drops of olive oil on low, toss in the kale, garlic and add then add a 1/4 cup of water; mix and cover with a lid. Simmer the leaves down until they've become very soft and a deep green. You can't really over cook kale, so just cook it until your desired texture.
3. As the kale is cooking, bring water in a medium sized pot to a boil. Peel each potato and cut into bite-sized pieces. Boil the potatoes for about 7-10 minutes or until tender.
4. When the potatoes are done cooking, drain and toss in with the kale. Now add in the cherry tomatoes, scallions and a tablespoon of olive oil; mix together well and continue to cook until all the ingredients are warmed through. Season with salt and pepper and serve!
Serves: 4
Total time: 25 minutes
*Kale and potatoes are both on the Dirty Dozen list, choose organic whenever possible.
LIVING SIMPLY GLUTEN FREE
Labels:
entree,
gluten-free,
kale,
Living Simply Gluten Free Recipes,
potatoes,
vegan,
vegetarian
Saturday, June 2, 2012
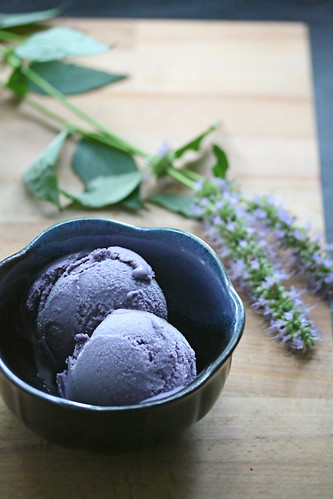
Blueberry-Hyssop Ice Cream
Recipe courtesy of Crumb Blog
Ingredients
-2 cups milk
-1 cup roughly chopped anise hyssop leaves
-2 1/2 cups fresh blueberries, washed and picked over
-2 tbsp lemon juice
-1 cup heavy cream
-3/4 cup unrefined sugar
-6 egg yolks
-2 tbsp Pernod(liqueur)
Directions
-In a small saucepan, bring milk to a simmer over medium-high heat. Remove from heat. Add the hyssop leaves, then cover and let steep for about 30-45 minutes.
-Meanwhile, combine the blueberries and lemon juice in a second saucepan, and bring to a boil over medium-high heat. Cook for 5 minutes, or until the blueberries begin to burst and release their juices. Puree with an immersion blender, then set aside to cool to room temperature.
-Once the milk is sufficiently infused, strain out the hyssop leaves and discard. Stir in cream, and bring to a simmer again over medium-high heat.
-Meanwhile, in a large mixing bowl, whisk together egg yolks and sugar. Ladle in a small amount of the warm milk mixture, whisking vigorously to keep the eggs from curdling. Slowly pour in the remainder of the warm milk, one or two ladlefuls at a time, whisking constantly as you go.
-Once all the milk has been incorporated into the eggs, pour mixture back into the saucepan. Cook over medium heat, stirring constantly and scraping the bottom of the pan, until mixture thickens enough to coat the back of the spatula (a silicone spatula is your best friend when it comes to custard-making – if you don’t have one, get one. It’s worth it). Remove from heat.
-Pour the blueberry puree through a sieve into a clean bowl, pressing on solids with back of a spoon. -Stir in the custard and Pernod, then cover with plastic wrap. Chill custard in refrigerator for at least 2-3 hours to ensure it’s thoroughly chilled before pouring into your ice cream maker and freezing as per manufacturer’s instructions.
Labels:
blueberries,
hyssop
Subscribe to:
Posts (Atom)